目录索引
译文
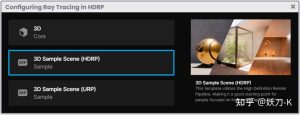
我们将使用Unity Hub 3.0.0-beta.6版本的默认模板开始本节。这样的模板看起来是这样的。
![图片[1]-《Unity着色器圣经》12.0.1 | Configuring Ray Tracing in HDRP.-软件开发学习笔记](https://gamedevfan.cn/wp-content/uploads/2025/05/image-157-1024x393.jpeg)
如本章开头所述,使用高清RP实现本效果是必要的。为了确保我们安装了高清RP包,我们可以通过转到Windows/Package Manager菜单来检查其配置(如图12.0.1b所示)。
![图片[2]-《Unity着色器圣经》12.0.1 | Configuring Ray Tracing in HDRP.-软件开发学习笔记](https://gamedevfan.cn/wp-content/uploads/2025/05/v2-4bdaf2e4d0ca424bf5b88b301917f276_1440w-1024x392.jpg)
高清RP的特点是其高质量的渲染和与高端平台的兼容性,即PC、PlayStation 4或Xbox One(更高版本)。
它还支持DirectX 11及更高版本和Shader Model 5.0,后者引入了用于图形加速的计算着色器。
在我们场景的开头,普遍存在一些纹理如图12.0.1c所示的情况。这是由于创建项目时生成的光照贴图中的配置错误。
![图片[3]-《Unity着色器圣经》12.0.1 | Configuring Ray Tracing in HDRP.-软件开发学习笔记](https://gamedevfan.cn/wp-content/uploads/2025/05/image-156-1024x393.jpeg)
为了解决这个问题,我们必须注意对象的配置。如果我们选择任何对象,例如FR_Section_01_LOD0(墙),我们会注意到它已从Unity Inspector标记为“静态”。然后,我们必须转到菜单“窗口/渲染/照明”并执行以下操作:
我们按下属于Generate Lighting按钮的下拉菜单,然后选择Clear Baked Data。通过执行此操作,将消除所有光照贴图,这将允许我们可视化默认照明。
接下来,我们必须按下“生成照明”按钮。
这个过程可能需要几分钟,具体取决于我们电脑的性能。但是,纹理和照明将在过程结束时正确显示。
![图片[4]-《Unity着色器圣经》12.0.1 | Configuring Ray Tracing in HDRP.-软件开发学习笔记](https://gamedevfan.cn/wp-content/uploads/2025/05/image-155-1024x393.jpeg)
值得注意的是,全局照明和其他特性(如环境光遮挡)正在每个纹理上“烘焙”。因此,如果我们更改对象的位置,其照明特性将保持其形状,并且不会重新计算。实时执行此过程的唯一方法是在我们的项目中激活光线跟踪。为此,我们必须考虑几种配置,包括DirectX 12(DX12)。整个过程可以概括为三个主要步骤;
- 渲染管道资源。
- 项目设置。
- DirectX 12。
我们将从菜单窗口/面板/项目设置开始,我们将注意以下类别:
- Quality.
- Graphics.
- HDRP Default Settings.
请注意,Unity为我们项目中的每个质量级别创建了不同的渲染配置,例如,我们的项目有三个默认质量级别,可以在“质量”选项卡中找到。
- High Quality.
- Medium Quality.
- Low Quality.
每个级别都有不同的“HD Render Pipeline Asset”,因此,如果我们想使用光线跟踪,我们必须从以前配置的资源中启用其选项;在这种特殊情况下为中等质量。
![图片[5]-《Unity着色器圣经》12.0.1 | Configuring Ray Tracing in HDRP.-软件开发学习笔记](https://gamedevfan.cn/wp-content/uploads/2025/05/image-154-1024x395.jpeg)
从我们的项目中选择HD渲染管道资源后,我们必须注意Unity Inspector中的“渲染”和“照明”菜单。从第一个下拉菜单开始,我们必须激活“实时光线跟踪(预览)”选项,如图12.0.1f所示。
如果我们的项目使用的是版本12以外的DirectX配置,则会显示以下消息:
Currently, Ray Tracing is only compatible with DX12.
由于光线跟踪在低于DirectX 12的版本中不起作用,我们稍后将不得不在项目中更改其配置。目前,我们将继续启用一些选项,以便执行全局照明计算和其他功能。
![图片[6]-《Unity着色器圣经》12.0.1 | Configuring Ray Tracing in HDRP.-软件开发学习笔记](https://gamedevfan.cn/wp-content/uploads/2025/05/image-153-1024x392.jpeg)
接下来,我们将转到“照明”菜单并启用以下选项:
- 屏幕空间环境光遮挡。
- 屏幕空间全局照明。
- 屏幕空间反射。
- 屏幕空间阴影。
在“剪裁空间”坐标继“屏幕空间”之后,屏幕空间指的是-1.0f到1.0f之间的坐标到屏幕坐标的转换。因此,我们可以推断,分辨率越高,光线投射计算就越高。因此,我们在GPU中需要的能耗就越多。
屏幕空间环境遮挡(SSAO)对应于能够实时再现环境遮挡的近似的图像效果。
屏幕空间全局照明(SSGI)将使我们能够实时计算照明的反弹,从而生成场景中构图的更准确的光表示。
屏幕空间反射将允许我们实时计算反射。
同样的类比也适用于Screen Space Shadows,它改进了我们项目中阴影的投影。
![图片[7]-《Unity着色器圣经》12.0.1 | Configuring Ray Tracing in HDRP.-软件开发学习笔记](https://gamedevfan.cn/wp-content/uploads/2025/05/v2-2eba55df4cf4ba05dfda467aa7a7acc8_1440w-1024x395.jpg)
到目前为止,光线跟踪及其属性已在渲染管道资源中启用。然后,我们必须配置我们的项目,以便这些属性可以执行它们的操作。
再次转到“ Windows / Panels / Project Settings”、“HDRP Default Settings”菜单,并确保“Rendering”下拉菜单中的“ay Tracing”选项处于选中状态。
![图片[8]-《Unity着色器圣经》12.0.1 | Configuring Ray Tracing in HDRP.-软件开发学习笔记](https://gamedevfan.cn/wp-content/uploads/2025/05/image-152-1024x393.jpeg)
然后,从“Lighting”菜单中,我们必须启用在“渲染管道资源”中激活的相同选项:“屏幕空间阴影”、“屏幕空间反射”、“屏幕空间全局照明”和“屏幕空间环境光遮挡”。
![图片[9]-《Unity着色器圣经》12.0.1 | Configuring Ray Tracing in HDRP.-软件开发学习笔记](https://gamedevfan.cn/wp-content/uploads/2025/05/image-151-1024x395.jpeg)
目前,光线跟踪已经在我们的项目中进行了配置。然而,我们必须更改DirectX配置,如上所述,此技术仅适用于版本12,但是我们的项目默认情况下是DX11。我们可以在工具栏上的Unity窗口中验证这一点,如图12.0.1j所示。
![图片[10]-《Unity着色器圣经》12.0.1 | Configuring Ray Tracing in HDRP.-软件开发学习笔记](https://gamedevfan.cn/wp-content/uploads/2025/05/v2-755540e450f0ad42ad79ebd371c25228_r-1024x391.jpg)
要执行此操作,我们必须转到菜单“ Windows / Render Pipeline / HD Render Pipeline Wizard”。
我们必须从DirectX光线跟踪选项卡(HDRP+DXT)中按下“全部修复”按钮。
![图片[11]-《Unity着色器圣经》12.0.1 | Configuring Ray Tracing in HDRP.-软件开发学习笔记](https://gamedevfan.cn/wp-content/uploads/2025/05/image-150-1024x395.jpeg)
一旦此过程完成,软件可能会要求重新启动。
当我们再次加载项目时,Unity将在界面顶部显示<DX12>标记。如果我们返回到“渲染管道向导”窗口,我们会注意到所有属性都显示为绿色,这意味着为它们启用了光线跟踪。
原文对照
We will start this section using a default template from Unity Hub, version 3.0.0-beta.6. Such a template looks like this.
![图片[1]-《Unity着色器圣经》12.0.1 | Configuring Ray Tracing in HDRP.-软件开发学习笔记](https://gamedevfan.cn/wp-content/uploads/2025/05/image-157-1024x393.jpeg)
As mentioned at the beginning of this chapter, using High Definition RP to perform the exercises will be necessary. We can check its configuration by going to the Windows / Package Manager menu and ensuring that the High Definition RP package is installed in our project (as shown in image 12.0.1b).
![图片[2]-《Unity着色器圣经》12.0.1 | Configuring Ray Tracing in HDRP.-软件开发学习笔记](https://gamedevfan.cn/wp-content/uploads/2025/05/v2-4bdaf2e4d0ca424bf5b88b301917f276_1440w-1024x392.jpg)
High Definition RP is characterized by its quality rendering and compatibility with high-end platforms, i.e., PC, PlayStation 4, or Xbox One (onwards).
It also supports DirectX 11 and later versions and Shader Model 5.0, which introduces Compute Shaders for graphics acceleration.
In the opening of our scene, it is widespread that some textures look like in figure 12.0.1c. It is due to a configuration error in the generated lightmaps when creating the project.
![图片[3]-《Unity着色器圣经》12.0.1 | Configuring Ray Tracing in HDRP.-软件开发学习笔记](https://gamedevfan.cn/wp-content/uploads/2025/05/image-156-1024x393.jpeg)
To solve this problem, we must pay attention to the objects’ configuration. If we select any object, e.g., FR_SectionA_01_LOD0 (wall), we will notice that it has been marked as “static” from the Unity Inspector.
Then, we must go to the menu Windows / Rendering / Lighting and perform the following operation:
- We press the dropdown belonging to the Generate Lighting button and select Clear Baked Data. By doing this action, all the lightmaps will be eliminated, which will allow us to visualize the default lighting.
- Next, we must press the Generate Lighting button.
The process may take a few minutes depending on our computer’s capacity. However, the textures and lighting will be displayed correctly at the end of the process.
![图片[4]-《Unity着色器圣经》12.0.1 | Configuring Ray Tracing in HDRP.-软件开发学习笔记](https://gamedevfan.cn/wp-content/uploads/2025/05/image-155-1024x393.jpeg)
Noteworthy that the global illumination and other properties, such as ambient occlusion, are being “baked” on each texture. Therefore, if we change the position of an object, its lighting properties will keep their shape and will not be recalculated.
The only way to perform this process in real-time is by activating Ray Tracing in our project. For this, we will have to consider several configurations for it, including DirectX 12 (DX12). The whole process can be summarized in three main steps;
- Render Pipeline Asset.
- Project Settings.
- DirectX 12.
We will start by going to the menu Windows / Panels / Project Settings, and we will pay attention to the following categories:
- Quality.
- Graphics.
- HDRP Default Settings.
Note that Unity creates a different rendering configuration for each quality level in our project, e.g., our project has three default quality levels, which can be found in the “Quality” tab.
- High Quality.
- Medium Quality.
- Low Quality.
Each of these levels has a different “HD Render Pipeline Asset,” therefore, if we want to work with Ray Tracing, we will have to enable its options from the previously configured Asset; in this particular case, Medium Quality.
![图片[5]-《Unity着色器圣经》12.0.1 | Configuring Ray Tracing in HDRP.-软件开发学习笔记](https://gamedevfan.cn/wp-content/uploads/2025/05/image-154-1024x395.jpeg)
After selecting the HD Render Pipeline Asset from our project, we must pay attention to the “Rendering” and “Lighting” menu found in the Unity Inspector. Starting in the dropdown of the first one, we will have to activate the “Realtime Ray Tracing (Preview)” option, as shown in Figure 12.0.1f.
If our project is using a DirectX configuration other than version 12, the following message will appear:
Currently, Ray Tracing is only compatible with DX12.
Since Ray Tracing does not work in versions lower than DirectX 12, we will have to change its configuration in our project later. For now, we will continue to enable some options that will allow us to perform global illumination calculations and other features.
![图片[6]-《Unity着色器圣经》12.0.1 | Configuring Ray Tracing in HDRP.-软件开发学习笔记](https://gamedevfan.cn/wp-content/uploads/2025/05/image-153-1024x392.jpeg)
Next, we will go to the “Lighting” menu and enable the following options:
- Screen Space Ambient Occlusion.
- Screen Space Global Illumination.
- Screen Space Reflection.
- Screen Space Shadows.
After the “clip-space” coordinate continues “screen-space,” which refers to the transformation of coordinates between -1.0f to 1.0f to screen coordinates. Therefore, we can deduce that the higher the resolution, the higher the Ray Casting calculation. Therefore, the more power we will need in the GPU.
Screen Space Ambient Occlusion (SSAO) corresponds to an image effect capable of reproducing an approximation of ambient occlusion in real-time.
Screen Space Global Illumination (SSGI) will allow us to calculate the bounce of illumination in real-time, generating a more accurate light representation of the composition in our scene.
Screen Space Reflection will allow us to calculate reflections in real-time.
The same analogy is valid for Screen Space Shadows, which improves the projection of shadows in our project.
![图片[7]-《Unity着色器圣经》12.0.1 | Configuring Ray Tracing in HDRP.-软件开发学习笔记](https://gamedevfan.cn/wp-content/uploads/2025/05/v2-2eba55df4cf4ba05dfda467aa7a7acc8_1440w-1024x395.jpg)
Up to this point, Ray Tracing and its properties are already enabled in the Render Pipeline Asset. Then, we must configure our project so that these properties can perform their operations.
Again, go to Windows / Panels / Project Settings, HDRP Default Settings menu, and make sure it has the “Ray Tracing” option active from the “Rendering” dropdown in the Frame Settings.
![图片[8]-《Unity着色器圣经》12.0.1 | Configuring Ray Tracing in HDRP.-软件开发学习笔记](https://gamedevfan.cn/wp-content/uploads/2025/05/image-152-1024x393.jpeg)
Then, from the Lighting menu, we must enable the same options that we activated in the Render Pipeline Asset: Screen Space Shadows, Screen Space Reflection, Screen Space Global Illumination, and Screen Space Ambient Occlusion.
![图片[9]-《Unity着色器圣经》12.0.1 | Configuring Ray Tracing in HDRP.-软件开发学习笔记](https://gamedevfan.cn/wp-content/uploads/2025/05/image-151-1024x395.jpeg)
At the moment, Ray Tracing is already configured in our project. However, we must change our DirectX configuration since, as mentioned above, this technique only works in version 12, and our project, by default, has been configured in DX11. We can verify this in the Unity window on the toolbar, as shown in figure 12.0.1j.
![图片[10]-《Unity着色器圣经》12.0.1 | Configuring Ray Tracing in HDRP.-软件开发学习笔记](https://gamedevfan.cn/wp-content/uploads/2025/05/v2-755540e450f0ad42ad79ebd371c25228_r-1024x391.jpg)
To do this, we must go to the menu Windows / Render Pipeline / HD Render Pipeline Wizard.
We must press the Fix All button from the DirectX Raytracing tab (HDRP + DXT).
![图片[11]-《Unity着色器圣经》12.0.1 | Configuring Ray Tracing in HDRP.-软件开发学习笔记](https://gamedevfan.cn/wp-content/uploads/2025/05/image-150-1024x395.jpeg)
The software may ask to restart once the process has finished.
When we load our project again, Unity will appear with the <DX12> tag at the top of the interface. If we go back to the Render Pipeline Wizard window, we will notice that all properties appear in green, which means that Ray Tracing is enabled for them.

![[udemy]在 Unity 中创建 RPG 游戏的终极指南-软件开发学习笔记](https://gamedevfan.cn/wp-content/uploads/2025/04/TheUltimateGuidetoCreatinganRPGGameinUnity.webp)
![[udemy]学习在 Unity 和 C# 中创建吸血鬼幸存者风格的游戏-软件开发学习笔记](https://gamedevfan.cn/wp-content/uploads/2025/04/LearnToCreateAVampireSurvivorsStyleGameinUnityC.webp)
![[udemy] 在 Godot 4 中创建完整的 2D 幸存者风格游戏-软件开发学习笔记](https://gamedevfan.cn/wp-content/uploads/2025/05/CreateaComplete2DSurvivorsStyleGameinGodot4.webp)
![[gamedev tv] RPG核心战斗力的创造者 :学习中级 Unity C# 编码-软件开发学习笔记](https://gamedevfan.cn/wp-content/uploads/2025/04/RPGCoreCombatCreatorLearnIntermediateUnityCCoding.png)
![[gamedev tv]Unity 2.5D 回合制角色扮演游戏-软件开发学习笔记](https://gamedevfan.cn/wp-content/uploads/2025/05/Unity2.5DTurn-BasedRPG.webp)


暂无评论内容